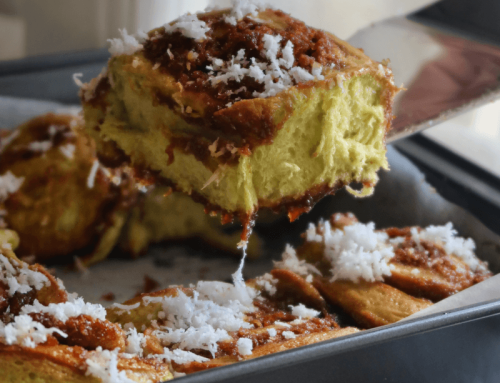
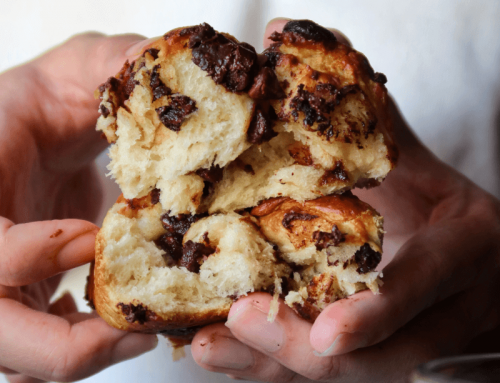
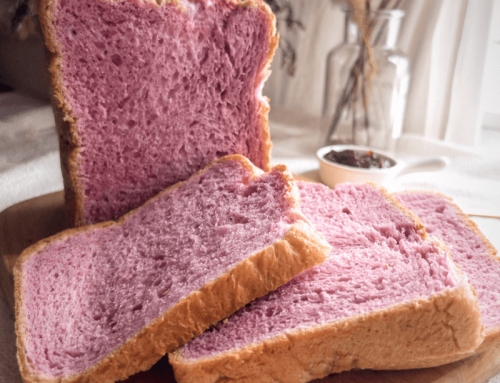
Lo and behold! The Devil’s Chocolate Bread comes with full richness from the stuffed dark chocolate! Furthermore, with a chocolate bread base, the flavour combination is one that is luxurious and for indulgence. This is definitely a recipe that is worth every calorie and you wouldn’t want to miss!

Also, this recipe is easy to manage and the dough is easy to work with. Furthermore, I chose to use the Tangzhong method for these Devil’s Chocolate Buns to give an extra fluffiness to the bread. With that, the texture combination of fudginess and fluffiness is one to behold!
Another reason why these are named Devil’s Chocolate Buns is simply because of its richness. The buns are chocolate all-around and inside-out. These buns just melt in your mouth!
I hope you will enjoy my bread recipe! Without further ado, Devil’s Chocolate Buns!
Devil’s Chocolate Bread Recipe
by Javier Tan June-28-2020
The Devil’s Chocolate Bread comes with full richness and indulgence from its melty medley of dark chocolates!
Ingredients
For Water Roux / Tangzhong:
- 3 Tablespoon + 1 Teaspoon or 50ml Water
- 3 Tablespoons or 45ml Milk
- 2 Tablespoons or 18g Bread Flour, Sifted
For Bread:
- 2 and 1/2 Cups or 300g Bread Flour
- 1/4 Cup or 25g Cocoa Powder
- 1/4 Cup + 1 Tablespoons or 62g Granulated White Sugar
- 1 Large Egg, Room Temperature, 55g incl. shell weight
- 3/4 Teaspoon or 4g Table Salt
- 1 Tablespoon or 8g Instant Dry Yeast
- 1/4 Cup or 60g Unsalted Butter, Melted
- 1/2 Cup + 2 Tablespoon or 150g Milk
- Between 150 to 250g (1 and 1/2 Cup to 1 and 1/4 Cup) of Semisweet Chocolate Chips (I used 70% Dark)
- All that was made Water Roux / Tangzhong
For Glaze:
- 1 Egg, lightly beaten
- Prepare the Water Roux / Tangzhong. Mix all 3 ingredients and heat using a saucepan at medium low heat until the flour has all dissolved and you form a sticky, slightly thickened gel.
- Cover the water roux and leave to cool. Meanwhile, mix Bread Flour, Cocoa Powder, Sugar, Salt and Yeast together in a large bowl. Make sure to put the salt and yeast at separate places before mixing.
- To another small saucepan, melt the softened butter at low heat.
- Once fully melted, turn off the heat and let it cool to room temperature. Then, add in the water roux/tangzhong, egg and milk and mix well until it forms a single wet mixture.
- Add in half of the wet mixture into the large bowl containing the dry ingredients and knead using a dough hook attachment at high speed for 1 min 30 seconds or until clumps can be observed.
- Mix in the second half and knead well for another 6-7 minutes at medium high speed. Once done, the dough will no longer stick to the bowl and it will pass the windowpane test.
- Transfer the dough to a large bowl and sprinkle some water on top of the dough. Cover it with a damp cloth or plastic wrap and proof for an hour.
- Once an hour is up, poke a hole at the center of the dough to release the excess air.
- Knead in the chocolate chips on the floured surface and shape into little balls of dough. I weighed the total weight of my dough and divided it by nine, each ball of dough weighed approximately 80g for mine!
- Transfer the little balls of dough onto your baking tray about 3 inches apart from each other, then cover and proof for another 25-30 minutes.
- Start preheating the oven at 180 degrees C when the proofing is about to be completed.
- Top with extra chocolate chips if desired before applying egg wash. Bake for about 18-22. If it gets too dark on the outside, place an aluminium foil over the top or reduce the temperature to 160 degrees C.
- Prep time: 1 hour 3
- Cook time:
- Total time: 2
- Yield: 9 Delicious Buns!
Notes:
- If you would like to be updated for more recipes which I strive to create to perfection for sharing and for free, do check out my Instagram, Facebook Page, or YouTube 🙂 Thank you so much for all of your support! Feel free to tag me or link back here!
- Store at room temperature for up to 5 days. Optimally, eat it within 4 days!
Enjoy!
– Bakeomaniac, Javier Tan


Hey, can I check if the milk should be warm, room temp or cold?
Hey Meera, thank you for dropping by my blog and for the good question! The milk should be room temp so that it doesn’t kill / slow down the yeast when it’s hot / cold respectively :-)!
Thank you so much for the prompt reply! Can’t wait to try it out, looks amazing!!:D
No problem Meera! Just in case, make sure to use chocolates that are darker or have higher fluidity so that they can have that ooze effect! If not, just place more chocolates :p
Thanks for the tip Javier! I tried to keep the choc chips to a min to control the calorie hahah! But it’s still chocolatey and yummy nevertheless!
I had to keep adding more flour to the dough when kneading tho.. probably cause of the humidity (not sure)… but the final product was good!
Pre-national day bake sesh was a success, I’d say hahah! Thank you for the recipe !
Am so so happy to hear that Meera and so sorry for the late reply! Am so glad that it worked out well for you and really great that you think on your feet and know how to fix it! I do face the same problems with the bread flour amount too here and there, I suspect it’s a humidity issue too.
Wishing you a safe and nice week ahead 🙂
Hi. If I want to do this using a Bread Machine, what should I do?
Hey Che! Thank you for dropping by my blog and apologies for the late reply! Its unlikely that this recipe will work out in the bread machine as the chocolate tends to melt into the bread and not be visible after baking.
If you do have an oven, consider letting the bread machine do all the kneading and then adding the chocolate chips in the center starting from step 9, with the first 8 steps being done using the bread machine 🙂 Hope that helps!
Thanks so much Javier! You’re a really great Baker!
No problem and thank you so much too for your kind appreciation Juliana 😀
I actually left the butter to melt using the residual heat from the pot after cooking thr Tangzhong. It’s a great recipe Javier!
The buns and soft and fluffy and the family enjoyed them very much. 😊
I’ll like to ask, if I were to adapt this recipe and make plain buns, do I replace the cocoa powder with the same amt of flour?
Hey Juliana, that’s a good question and I am glad you like the recipe 😀 most importantly, your family liked it!
For a plain version, here it is: https://bakeomaniac.com/fluffy-hokkaido-milk-buns-recipe/
Hope you will like these as much if not more :p
is this melted butter still warm when we add the roux and other ingredients ? Or do we have to cool it first.
Hey Selena, really good question! It needs to be cooled down 🙂
HI Javier, for no. 9 “Knead in the chocolate chips on the floured surface”, does it mean the dough needs to be flatten first then add in the choc chips and knead? so the end product will be like a ball full of choc chips around it? sorry for asking such silly question as I’m a total newbie here 😅
Hey Cindy! No worries at all and I am glad that you have the courage and initiative to clarify! I am more than happy to help 😀
You don’t necessarily have to flatten it. I knead and work it in slowly even as a ball of dough, as long as the chocolate chips get incorporated. But yes, I do stuff extra chocolate chips in the center for individual buns so in the end the end product does look like a bag full of choc chips :p
Hope that helps and feel free to ask if anything!